Making a scenic display plinth - or Lord of Blights masterclass part: 9.5
Hello everyone, I hope you are all safe and well with everything that's going on out there at the moment.
You'd have thought lock-down/isolation would have meant more hobby time. But I'd say it's actually the reverse. With the kids wanting constant attention/entertainment, running the household and getting all geared up to go out on supply runs on my own, things have been a bit of a handful.
Add to that the added stresses of the current situation, my mental health took a bit of a beating during the first couple of weeks, but I'm more or less out of that now and functioning on this new equilibrium. It's actually been difficult to get solid blocks of time to work, so my hobby has just been a few moments here and there when I could grab it (when I was even in the mood to that is)
But that's that. It is what it is.
I decided since I was following the Lord of Blights Masterclass as a one off for painting practice/experience and that it would be a display miniature rather than a gaming piece. Then the only proper thing to do to finish it off would be to put in a bit more effort and make myself a scenic display plinth to go with it.
In keeping with Darren Latham's final video I am intending on finishing this off as a Wintery base. I wanted it to look like a small cutaway of a mountain path/passage the Lord of Blights has just exited from.
I documented my process so that I could share it here with you.
Here is what I came up with, we'll go through how I built this thing:
Starting the wooden plinth
It all started of with a length of stair bannister post. I just cut a couple of different height pieces with a combination of razor saw and hacksaw.
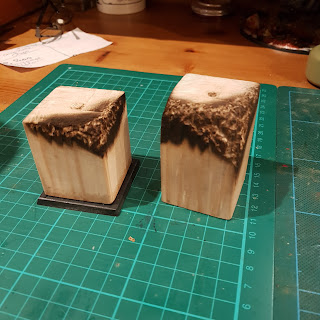
With the excess carbon brushed off you can see the texture a lot better in the following image. You can also see that I was adding a square base to one of the plinths as an added bit of detail.
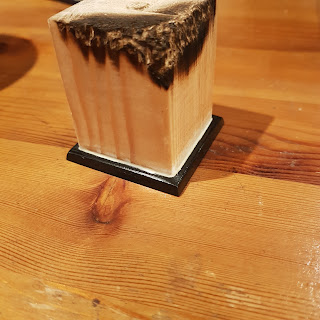
The base just needed a little gap filling to blend it into the plinth itself, with a little paint and varnish it should look seamless.
But it was at this point of making these specific plinths that I realised they were not big enough for the idea I had in mind...
So... Let's start all over again...
Starting the plinth all over again
I use wooden blocks for holding miniatures while I'm painting and after a cursory look at them decided to sacrifice one of the bigger blocks I had to be the plinth for my miniature.
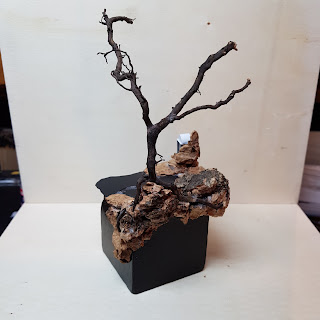
Again I burned the edge for a little texture and you can see the early stages of me planning the composition using cork bark to build up some rocky areas and cutting/gluing some dried plant roots to make a crooked gnarly old tree sweeping over in the background.
There was a lot of cutting and fitting during this stage of the build, chunks of cork bark cut and carved to fit in place, roots cut and fit to add more branches and roots to the tree. I used the superglue/bicarbonate of soda technique for these connections to make them a lot sturdier.
In the following images you can just about make out some pencil lines as I was planning the space taken up by the miniature and some other areas of detail/land-form I was thinking about adding.
This was my general mock-up, it changed slightly from this but not very much so. So this was my initial sketch/idea of where I wanted to place things.
Adding more detail, building a shrine
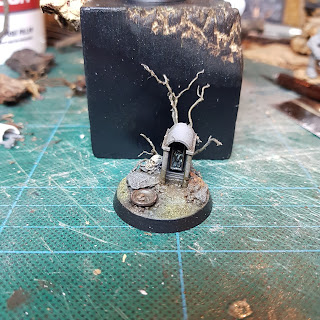
During the build I remembered a little basing experiment I'd done a while back of a little road-side shrine and decided I wanted to incorporate this idea into the plinth too. Not an exact copy but similar in concept.
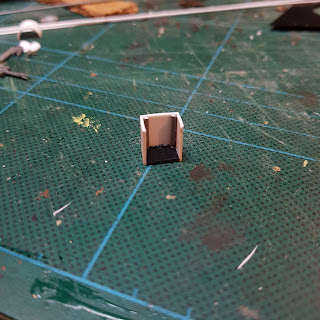
The shrine is a really simple thing to build, for the most part it is made from a short lengths of styrene tube, one circular, one rectangular. then some pieces of styrene rod and little incidental bits of detail from miniature kits.
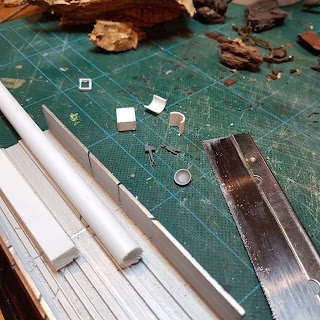
You can see below everything that went into building the new shrine:
- The rectangular tube had one face cut away to make an open box.
- The circular tube was cut in half vertically to create the roof.
- The face I originally cut away from the rectangular tube was used to make the two semi-circular pieces to fill the sides of the roof.
- a few short lengths of round and square rod were cut to be used as columns and edging.
- some scrap plastic card was used for making a floor/base for the shrine, cut to fit the interior.
- Then the final touches would be a hammer and comet icon from the empire flagellant kit and a small dwarf shield with the front detail carved off and turned over to be a votive/offering plate.
Then it was just a simple case of constructing all the little pieces. The floor pieces were glued in followed by two pieces of rod for column detail in the back of the shrine.
The two semi circles glued into the roof sides. two more columns, square edging pieces, detail bits added. The following images show how simple a build it was.
I cut some thin slivers of round styrene rod to make coins for the offering plate. The green you see is some watered down liquid greenstuff with a light sprinkle of bicarbonate of soda to make a fine rough texture on piece.
And then when the shrine was fully built and textured, all that was left to do was destroy it!
I built up a new rack face and ledge/shelf with an alcove that the road-side shrine would be built into. at this point I also realised that I wanted to have a touch more ground to play with and used a scrap of plastic card to extend the front of the base out slightly.
I didn't just want his to be some scenic detail stuck to the top of the plinth and instead wanted to play with the detail overflowing the edge somewhat.
With the back being like a little part of the cliff-face the path runs along, trailing down the back of the base and the tree roots flowing down it.
And the front/sides looking like a cut-away of the ground the mountain path runs over.
Still checking the composition as I worked I was really liking where it had got to and just had to add the final detailing/textures.
I made up the frozen/packed ground texture from some ready made filler with a little paint and sand added. I cut a small wedge out of a small piece of styrene tube, leaving a "U" shape to make hoof prints in the ground texture. I also used a spare unpainted miniatures foot to add a couple of footprints here and there.
I apologise, but I do seem to have missed one step in photos. During the texturing step I mixed up a paste of grit/sand/static grass and some of the finest tiny roots and dirt and pushed this into gaps and flat areas. You will be able to see it in the primed pictures following.
Completed base build and primed
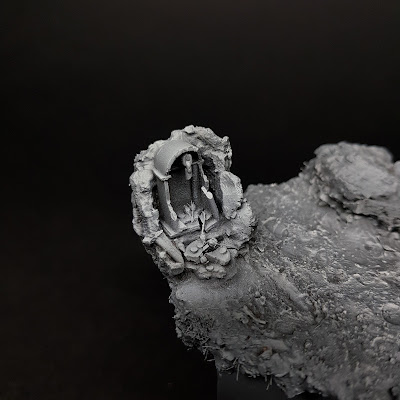
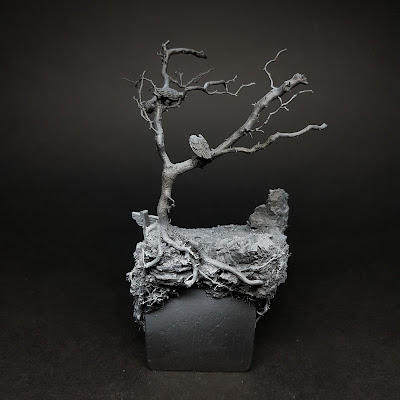
So after the texturing I added and blended in all the other details I wanted in the scene. the broken shrine in the rock shelf, an old road sign and a pair of carrion birds perched in the tree.
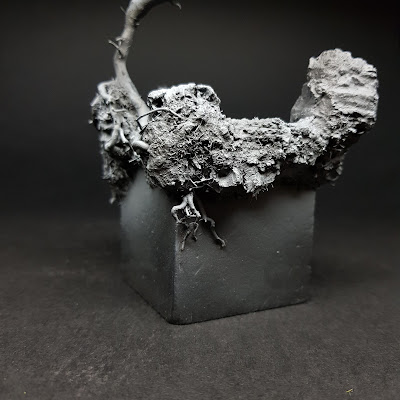
The whole thing was given a zenithal prime to really bring it all together and bring out the details.
The broken shrine with all it's votive offerings scattered around. While I was working on the roots I found some really tiny dried flowers that I thought would be really fitting to add here.
There around the back of the road sign and the ground around the base of the tree you can see the static grass paste I added a little more clearly.
I really enjoyed making the tree roots that are growing down the side of the cliff-face.
These are the broken off pieces of the shrine and offerings that I will be adding back onto the base after I've laid down the snow texture.
And there we are. One scenic plinth base of a mountain path ready to paint, not long now (hopefully) and the project will be finished!
Bonus Material!
I don't like things going to waste, so while I was building the plinth I used any left-over bits and excess paste etc to do two more at the same time.
One is from right at the start of this article, the other was one I'd started making years back out of a dice container and some slate, it ended up just sitting in the bottom of a box and I decided to pull it out and finish it off.
So I have two more completed plinths ready for any future project I decide to stick on there!
Have a sneak peek
That's right we're not done yet!
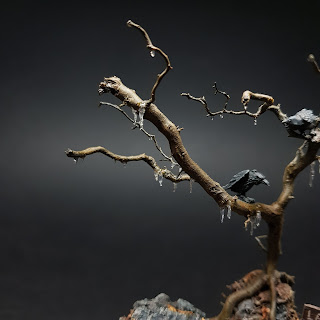
At the time of getting around to writing this up I've already completed the painting of the base, so have a little sneak at some of the details. I'll reveal the whole thing in the final part of the Masterclass series.
Even though I built a plinth and didn't just use a base I kept to the same colour choices Darren Latham used in his part 10 video.
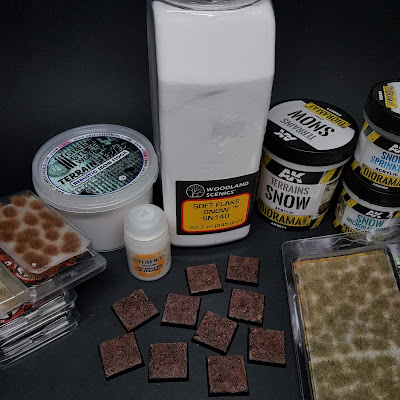
When I got to the point the base was painted I realisd I didn't know what I really wanted to do for the snow effects. I've got a few different products I've picked up over the years that I want to try out.
So I knocked up a few test bases so I can experiment with these products to find a look I want for the finished scene.
So that's where I'm at right now folks. I need to get on with these snow experiments and once I find what I like, then the plinth should be finished rather quickly and I can post up and write about the finished piece.
As I said at the beginning of this article, hobby time is a bit spotty and erratic at the moment but I hope to get this done very soon.
Until next time,
take care.
You'd have thought lock-down/isolation would have meant more hobby time. But I'd say it's actually the reverse. With the kids wanting constant attention/entertainment, running the household and getting all geared up to go out on supply runs on my own, things have been a bit of a handful.
Add to that the added stresses of the current situation, my mental health took a bit of a beating during the first couple of weeks, but I'm more or less out of that now and functioning on this new equilibrium. It's actually been difficult to get solid blocks of time to work, so my hobby has just been a few moments here and there when I could grab it (when I was even in the mood to that is)
But that's that. It is what it is.
I decided since I was following the Lord of Blights Masterclass as a one off for painting practice/experience and that it would be a display miniature rather than a gaming piece. Then the only proper thing to do to finish it off would be to put in a bit more effort and make myself a scenic display plinth to go with it.
In keeping with Darren Latham's final video I am intending on finishing this off as a Wintery base. I wanted it to look like a small cutaway of a mountain path/passage the Lord of Blights has just exited from.
I documented my process so that I could share it here with you.
Here is what I came up with, we'll go through how I built this thing:
Starting the wooden plinth
It all started of with a length of stair bannister post. I just cut a couple of different height pieces with a combination of razor saw and hacksaw.
I remembered this article I read years back on Massive Voodoo that I'd always wanted to have a go at. Burning the edges of your display plinth to get an interesting texture.
With the excess carbon brushed off you can see the texture a lot better in the following image. You can also see that I was adding a square base to one of the plinths as an added bit of detail.
The base just needed a little gap filling to blend it into the plinth itself, with a little paint and varnish it should look seamless.
But it was at this point of making these specific plinths that I realised they were not big enough for the idea I had in mind...
So... Let's start all over again...
Starting the plinth all over again
I use wooden blocks for holding miniatures while I'm painting and after a cursory look at them decided to sacrifice one of the bigger blocks I had to be the plinth for my miniature.
Again I burned the edge for a little texture and you can see the early stages of me planning the composition using cork bark to build up some rocky areas and cutting/gluing some dried plant roots to make a crooked gnarly old tree sweeping over in the background.
There was a lot of cutting and fitting during this stage of the build, chunks of cork bark cut and carved to fit in place, roots cut and fit to add more branches and roots to the tree. I used the superglue/bicarbonate of soda technique for these connections to make them a lot sturdier.
In the following images you can just about make out some pencil lines as I was planning the space taken up by the miniature and some other areas of detail/land-form I was thinking about adding.
This was my general mock-up, it changed slightly from this but not very much so. So this was my initial sketch/idea of where I wanted to place things.
Adding more detail, building a shrine
During the build I remembered a little basing experiment I'd done a while back of a little road-side shrine and decided I wanted to incorporate this idea into the plinth too. Not an exact copy but similar in concept.
The shrine is a really simple thing to build, for the most part it is made from a short lengths of styrene tube, one circular, one rectangular. then some pieces of styrene rod and little incidental bits of detail from miniature kits.
You can see below everything that went into building the new shrine:
- The rectangular tube had one face cut away to make an open box.
- The circular tube was cut in half vertically to create the roof.
- The face I originally cut away from the rectangular tube was used to make the two semi-circular pieces to fill the sides of the roof.
- a few short lengths of round and square rod were cut to be used as columns and edging.
- some scrap plastic card was used for making a floor/base for the shrine, cut to fit the interior.
- Then the final touches would be a hammer and comet icon from the empire flagellant kit and a small dwarf shield with the front detail carved off and turned over to be a votive/offering plate.
Then it was just a simple case of constructing all the little pieces. The floor pieces were glued in followed by two pieces of rod for column detail in the back of the shrine.
The two semi circles glued into the roof sides. two more columns, square edging pieces, detail bits added. The following images show how simple a build it was.
I cut some thin slivers of round styrene rod to make coins for the offering plate. The green you see is some watered down liquid greenstuff with a light sprinkle of bicarbonate of soda to make a fine rough texture on piece.
And then when the shrine was fully built and textured, all that was left to do was destroy it!
I built up a new rack face and ledge/shelf with an alcove that the road-side shrine would be built into. at this point I also realised that I wanted to have a touch more ground to play with and used a scrap of plastic card to extend the front of the base out slightly.
I didn't just want his to be some scenic detail stuck to the top of the plinth and instead wanted to play with the detail overflowing the edge somewhat.
With the back being like a little part of the cliff-face the path runs along, trailing down the back of the base and the tree roots flowing down it.
And the front/sides looking like a cut-away of the ground the mountain path runs over.
Still checking the composition as I worked I was really liking where it had got to and just had to add the final detailing/textures.
I made up the frozen/packed ground texture from some ready made filler with a little paint and sand added. I cut a small wedge out of a small piece of styrene tube, leaving a "U" shape to make hoof prints in the ground texture. I also used a spare unpainted miniatures foot to add a couple of footprints here and there.
I apologise, but I do seem to have missed one step in photos. During the texturing step I mixed up a paste of grit/sand/static grass and some of the finest tiny roots and dirt and pushed this into gaps and flat areas. You will be able to see it in the primed pictures following.
Completed base build and primed
So after the texturing I added and blended in all the other details I wanted in the scene. the broken shrine in the rock shelf, an old road sign and a pair of carrion birds perched in the tree.
The whole thing was given a zenithal prime to really bring it all together and bring out the details.
The broken shrine with all it's votive offerings scattered around. While I was working on the roots I found some really tiny dried flowers that I thought would be really fitting to add here.
There around the back of the road sign and the ground around the base of the tree you can see the static grass paste I added a little more clearly.
I really enjoyed making the tree roots that are growing down the side of the cliff-face.
These are the broken off pieces of the shrine and offerings that I will be adding back onto the base after I've laid down the snow texture.
And there we are. One scenic plinth base of a mountain path ready to paint, not long now (hopefully) and the project will be finished!
Bonus Material!
I don't like things going to waste, so while I was building the plinth I used any left-over bits and excess paste etc to do two more at the same time.
One is from right at the start of this article, the other was one I'd started making years back out of a dice container and some slate, it ended up just sitting in the bottom of a box and I decided to pull it out and finish it off.
So I have two more completed plinths ready for any future project I decide to stick on there!
Have a sneak peek
That's right we're not done yet!
At the time of getting around to writing this up I've already completed the painting of the base, so have a little sneak at some of the details. I'll reveal the whole thing in the final part of the Masterclass series.
Even though I built a plinth and didn't just use a base I kept to the same colour choices Darren Latham used in his part 10 video.
Frozen water and fallen leaves litter the ground of the base.
And icicles can be found all over the place.
When I got to the point the base was painted I realisd I didn't know what I really wanted to do for the snow effects. I've got a few different products I've picked up over the years that I want to try out.
So I knocked up a few test bases so I can experiment with these products to find a look I want for the finished scene.
So that's where I'm at right now folks. I need to get on with these snow experiments and once I find what I like, then the plinth should be finished rather quickly and I can post up and write about the finished piece.
As I said at the beginning of this article, hobby time is a bit spotty and erratic at the moment but I hope to get this done very soon.
Until next time,
take care.


