Giant Necromundan Sump Spider
"Call me Kruknek, the Outcast, only survivor - may the gods forgive me - of that ill-fated slimedrifter Hydra.
It seems now a lifetime ago since we set out on the toxic sump deep in the black heart of the hive to hunt the savage Raft Spiders of the underworld..."
It seems now a lifetime ago since we set out on the toxic sump deep in the black heart of the hive to hunt the savage Raft Spiders of the underworld..."
Hi everybody, back again and with yet another denizen of the deepest bowels of the underhive.
That little snippet above is from one of my all time favourite pieces of short 40k narrative from way back in the original Necromunda game. A story about spider "whalers", that was basically a barely re-skinned retelling of Moby Dick in the 40k universe. But still a wonderful read and glimpse into the storytelling possibilities of the setting.
I loved that story and would read it over and over, imagining how awesome it would be to try to play that as a game. And I always wanted to create a Giant Sump Spider one day... Well that day finally came:
Construction:
I'd always had a mind to make one of these gigantic spiders and when WHFB 9th wrapped up and the Old World died I still had an unopened Arachnarok Spider that I didn't intend on using with my Orcs & Goblins any longer.
That's how long ago this miniature started, it even pre-dates having a round base big enough to fit it. But other projects and house moves interrupted it and it just went into a storage box... For years!
But I recently felt the itch to get back on with this miniature and now of course had a suitable base to use. I finished the build a little while back, which was just a few days work. Then recently painted it in a single sitting.
I wanted the modelling of the piece to imply the history of this monstrous creature and the battle for survival she has weathered:
Old bullet wounds were drilled and scored into various parts of the carapace/chitin.
Hundreds of eggs of her tiny young carried around for protection, these were made with my oft used water filter balls.
Somewhere in the underhive she got all tangled with some barbed-wire.
Bolts and cords from hunters in the past that tried to bring her down now just hanging broken.
And other reminders of ill fated hunts with old broken harpoons peppering her back. These were interesting to make, using some watch parts, dress-makers pins and a little fine chain.
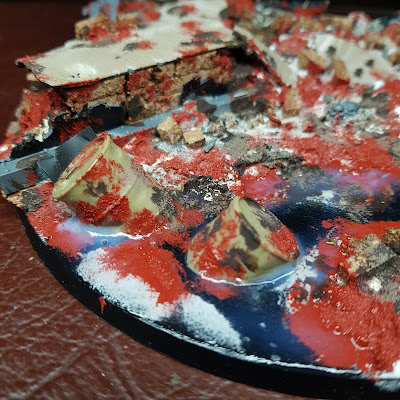
At this stage of the build the base I created just looks like a confusing mess. Lots of built up ground-work, an old industrial ruin by the "water"-side, barrels floating in the effluent and lots of different texture pastes/paints to blend everything together.
The first stages of the "water" were several layers of W&N structure gel medium over the plain base areas to make a smooth surface.
I found an old baggy of some cork bricks I'd made and decided to use them up on this piece.
Some of the scenic elements were strategically placed to give places to glue the spider in place and give it some firm anchors to the base. As I said before, the build of the model predated having a round base and I had to make sure it fit as naturally as possible.
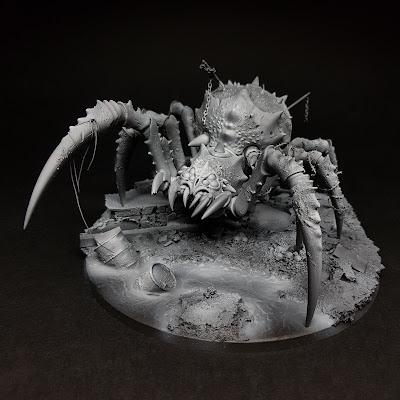
I believe this was the final shot of the thing with all the details added on the model and all the scenic elements placed, but just before applying the gel medium for the "water". The spider was kept separate for ease of painting it and the base.
I did forget to take a photo. Before priming I thought the model was still a little plain, I stippled some of the same red oxid texture paint used on the base around areas of the carapace/chitin just for a little more texture.
Painting:
The painting of this was relatively quick overall. A lot of the mood was established at the priming step using black primer and building up the lighting/forms using white ink through my airbrush.
This actually did the majority of the work for me before even adding a single colour.
I went back to the spider with some black ink through the airbrush to do some simple shading and painting in the black areas of the legs and spines.
I also went back and forth with black and white ink, flicking the trigger of my airbrush to intentionally spatter random dots all over the spider for some more texture and variety.
The painting went so fast on the spider that I'd actually finished it before realising I hadn't taken a photo part way through.
I sort of flitted between the spider and base as I worked or waited for bits to dry. The base actually took more work than the spider in the end, but even that came together quite quickly.
 |
The model was mainly coloured with enamel washes, AK interactive Streaking Grime and Dark Streaking Grime, layered on and excess removed using white spirit, the zenithal underpaint pulling a lot of weight here.
To bring the highlights back up and to give it back some of it's white colour I actually decided to experiment by drybrushing the raised areas with white oil paint, this worked out really well because I could brush it over the surfaces and unlike drybrushing with acrylics it was smooth not chalky and I could use a dry clean brush to blend out the edges.
The fleshy underbelly was given a couple of coats of Citadel Contrast Volupus Pink thinned with Contrast Thinner. This was the first time I've used Citadel Contrast on a large area and the effect turned out alright, a little rough and stained in places, but I think they're worth revisiting again. When these areas were dry I gave it the same white oil paint brush over as previously described.
The eggs were given a heavy wash of Reikland Fleshshade Gloss for another bit of contrast in colour and finish to the rest of the model.
The rusty metal areas were painted the same way as I will describe on the base in the next image.

This part was all done with brush.
The first layer of colour was just a really heavy pool of citadel shades Agrax Earthshade, Seraphim Sepia, Athonian Camoshade and Biel-Tan Green, all slopped on and mixed/swirled together then left to dry.
Additional colour came from AK Interactive Slimy Grime and Nurgles Rot.
W&N structure gel along with W&N varnish.
So the process is a little odd to describe:
So here we are, I made a Giant Necromundan Sump Spider...
The eggs were given a heavy wash of Reikland Fleshshade Gloss for another bit of contrast in colour and finish to the rest of the model.
The rusty metal areas were painted the same way as I will describe on the base in the next image.

Again the zenithal underpainting helped the base come together quickly too.
The main colours were applied quickly with airbrush, various Vallejo Air paints were used I didn't actually note which, just grabbing what looked right at the time. various grey-green and brown-grey for the ground, I didn't even clean out the cup, just added a few drops of paint and kept spraying it through to vary the colouring.
A muted ochre/yellow was used on the barrels and a couple of the metal sheets around the base.
The metal areas (and on the spider) were painted with Vallejo Metal Color paints, these paints are wonderful, nice and thin, paint on smoothly with brush and airbrush with great pigment strength.
Much like the ground areas I didn't really clean out my cup, using Steel, Burnt Metal and Copper I just added drops as I felt were needed and tried to have some variety in the metal.
Everything at this point was given the same AK Grime washes as the spider and cleaned back with white spirit. Then I came back in with various Rust Washes and Pigments and the metal was done.
The eggs you see around the base painted the same way as on the spider itself.
The eggs you see around the base painted the same way as on the spider itself.
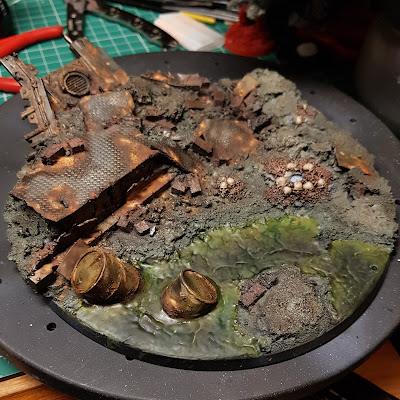
The toxic water pool was the part of this that had the most back and forth. And I used a... erm... I'll call it a technique... Essentially what I did would be something that would be a mistake, but I did it on purpose to make a specific effect.
Toxic Water Pool:
Toxic Water Pool:
This part was all done with brush.
The first layer of colour was just a really heavy pool of citadel shades Agrax Earthshade, Seraphim Sepia, Athonian Camoshade and Biel-Tan Green, all slopped on and mixed/swirled together then left to dry.
Additional colour came from AK Interactive Slimy Grime and Nurgles Rot.
W&N structure gel along with W&N varnish.
And a hairdryer.
So the process is a little odd to describe:
After the initial washes were dried to set the base colour. I would apply more wet wash, dry it with the hair dryer. Add slimy grim, hair dryer, water thinned structure gel, hair dryer, nurgles rot, hair dryer, more wash, hairdryer, varnish hairdryer.
Just going back and forth adding colour or slime or structure gel or varnish as I felt needed, it wasn't an exact science more just a feel and quickly drying it with the hairdryer between layers. It might sound convoluted and time intensive but I think the whole process was less than an hour, not even close.
Just going back and forth adding colour or slime or structure gel or varnish as I felt needed, it wasn't an exact science more just a feel and quickly drying it with the hairdryer between layers. It might sound convoluted and time intensive but I think the whole process was less than an hour, not even close.
Now when I said before this is normally a mistake what I meant was that forcing washes/shades, structure gel and varnish to dry too quickly can have an adverse effect. you get a lumpy, gooey, dimpled, coffee stained and cracked mess depending on which medium we're talking about. Which is why you normally let these things dry naturally.
But that was exactly the effect I wanted for a nasty, crud filled, toxic waste pool. So it just goes to show, what you might consider a hobby mistake one day, is actually a useful technique for another.
Will you or I be able to easily replicate this effect on future projects? Who knows, it's a little random, but that's half the fun.
The image below is what the finished toxic pool looked like bar one last step. After I had glued the spider in place and let it sit for a couple of hours to make sure it was in fact completely dried/cured; I gave it just a really light brush over with W&N satin varnish to add a little shine back to the liquid.
Conclusion:
Is this a gaming piece? A display piece? A mini-diorama? All of the above?
I'm just happy to have finally got around to a project I've wanted to do since my teens and literally started on years ago.
I'm just happy to have finally got around to a project I've wanted to do since my teens and literally started on years ago.
I really enjoyed creating this miniature whether it sees a table or not. I hope you enjoyed seeing it and the process I went through creating it too.
Take care.


