Darren Latham - Lord of Blights Masterclass - Part 08: Painting the Horns, Leather and Maggots
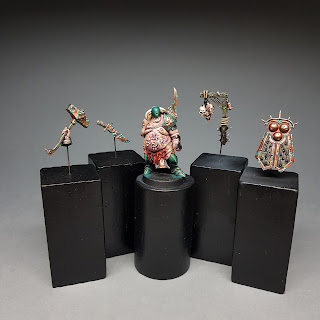
Part 08 focuses on painting all the smaller details left to paint around the figure.
The title says it all really, this is where the figure is on the verge of finishing and it's just fiddly little details. As such this post is not done in a step by step format like the others, but I still have some thoughts to share on this particular part of the masterclass.
Here was me set up to begin part 08... Look at all those paints for such tiny details!?! The whole project was a bit like this to be fair, in my final post I will talk about that...
Painted:
That's right, bam! Straight to painted... To be quite honest a lot of the details I was painting at this stage were very small and stopping to take step by step images would have been an absolute ball-ache!
But here's a quick rundown:
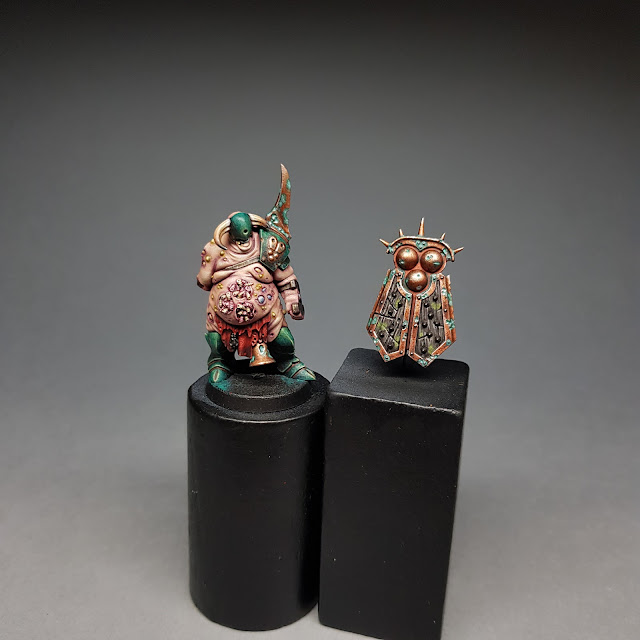
- The leather was painted to be dark and neutral, the highlights applied to simulate scratched rough leather.
- The horns were painted going from dark at the tip all the way to light at the base to try draw attention to the face/helmet area. Hand painting on several layers of bone ridges.
- The maggots... They were painted to be maggots, some white, some pink. Nondescript to not draw attention away from the rest of the model.
Darren Latham is a robot! Or has superpowers! Or he's a robot with superpowers!!!
Part 08 complete:
This means that the next part is assembly of the figure and some final tweaks to finish off any areas that need a little more highlight/shading with all the parts in place...
That's it... Build the figure and a little once over and finishing up... Then we're on to the final part of the series, basing the figure... I have a few ideas I'm toying with.
It won't be long now until it's complete, sorry it was such a short one, but it still left me with things to think about.
I will return shortly with what should hopefully be a fuly assembled and painted figure!
Until then,
Take care
The title says it all really, this is where the figure is on the verge of finishing and it's just fiddly little details. As such this post is not done in a step by step format like the others, but I still have some thoughts to share on this particular part of the masterclass.
 | |
|
Here was me set up to begin part 08... Look at all those paints for such tiny details!?! The whole project was a bit like this to be fair, in my final post I will talk about that...
Painted:
That's right, bam! Straight to painted... To be quite honest a lot of the details I was painting at this stage were very small and stopping to take step by step images would have been an absolute ball-ache!
But here's a quick rundown:
- The leather was painted to be dark and neutral, the highlights applied to simulate scratched rough leather.
- The horns were painted going from dark at the tip all the way to light at the base to try draw attention to the face/helmet area. Hand painting on several layers of bone ridges.
- The maggots... They were painted to be maggots, some white, some pink. Nondescript to not draw attention away from the rest of the model.
My thought's on this part of the series:
It's a lot of what we've already seen before throughout the masterclass, simulate a material texture with the leather, hand paint in the ridges on the horns, but all on a smaller scale due to the size of the actual details in question... Which leads me to my next thought...
Darren Latham is a robot! Or has superpowers! Or he's a robot with superpowers!!!
This guy paints blends/glazes and super thin lines with ease and at a baffling speed to me. For every one slightly wonky line I painted he painted two super thin, super straight lines!!!
But seriously, this section even though just little details took me much of the day to complete. Trying to get razor sharp highlights and hand paint in lines on the leather and horns took a lot of focus and concentration (and yes, I ended up with eye strain and a headache) .
I'm not 100% happy with my final result, but I made my best effort, I don't normally try to paint at a display quality and this is the sort of thing that comes with much more time and practice invested... So completely happy with the result, no. Happy with the effort I put in to attempt it, yes.
Part 08 complete:
And now that's all parts of the figure finally painted...
This means that the next part is assembly of the figure and some final tweaks to finish off any areas that need a little more highlight/shading with all the parts in place...
That's it... Build the figure and a little once over and finishing up... Then we're on to the final part of the series, basing the figure... I have a few ideas I'm toying with.
It won't be long now until it's complete, sorry it was such a short one, but it still left me with things to think about.
I will return shortly with what should hopefully be a fuly assembled and painted figure!
Until then,
Take care


